Where saddle cuts are needed
Wherever a round pipe butts against another: posts under a handrail, rails between posts, braces in frames, branches in pipework. A pipe sawn off square would touch at two points only and leave large gaps on both sides. The saddle cut closes them – the weld becomes even, the joint is strong and looks clean.
The geometry in one sentence
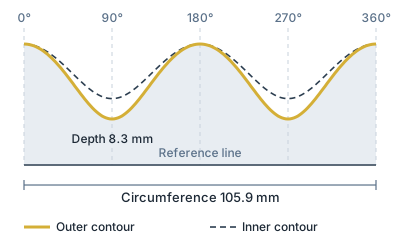
For every point on the circumference of the branch pipe you calculate how far it reaches until it meets the surface of the main pipe. With R as the radius of the main pipe, r as the radius of the branch pipe, the angle α between the axes and the angle θ around the branch pipe, the cut height is:
h(θ) = √(R² − (r · sin θ)²) ÷ sin α − r · cos θ ÷ tan α
At 90° the second term disappears and the curve is symmetrical with two equal valleys. At a slant it becomes one-sided: one long point and one short saddle. Plot h over the unrolled circumference and you have the template.
| Case | Shape of the curve |
|---|---|
| equal diameters, 90° | deep saddle, two peaks running to a sharp point |
| small pipe on large pipe, 90° | shallow wave, little material removed |
| angled joint (for example 45°) | one long and one short side, template not symmetrical |
Marking out
- Measure both diameters – do not take them from the catalog.
- Print the template, check it against the control ruler and cut along the outer contour.
- Scribe a straight line along the pipe (lay a piece of angle on it). The 0° line of the template is aligned to it.
- Wrap the template tightly; start and end must meet exactly. If they do not, the diameter is wrong.
- Transfer the contour with a scriber or a fine marker.
With several branches on one pipe the scribed lines must match each other, otherwise the branches end up twisted.
Cutting and clean-up
- Angle grinder with a thin cutting disc: for one-offs; rough cut, then grind to the line with a flap disc.
- Belt grinder with a contact wheel in pipe diameter: fast and accurate for 90° joints of equal pipes.
- Hole saw in a tube notcher: clean, if the saw diameter matches the main pipe.
- Plasma or laser: for series; here the flat pattern is used as the cutting contour.
From about 3 mm (1/8 in) wall thickness the inside edge is dressed until the pipe also seats on the inside. An even, small gap is better than a pipe that sits hard in one place and gapes in another.
Common mistakes
- Template printed at the wrong scale
- Template applied turned by 180° (on an angled joint the long side then sits on the wrong side)
- Nominal size used instead of the measured size
- Stainless steel worked with tools that have ground mild steel before – this leads to rust spots later
The pipe notching template generates the pattern at 1:1. For corners without a branch, use a miter cut.